1. Overview
This guide is for engineers, consultants, and others who plan to create custom rules for Windup 2.0.
![]()
1.1. What is Windup?
JBoss Windup is a rule-based tool to simplify application migrations.
Running from a Forge environment, the tool examines EAR, WAR, and JAR deployments (or a project source directory) and produces an HTML report detailing the inner workings of the Java application to simplify migration efforts. It seeks to make migrating from other containers to JBoss EAP a piece of cake.
1.1.1. Windup 2.0 vs. Windup 0.7.x
Windup 2.0 aims to deliver the same functionality as legacy Windup, however, the internal architecture and rule structure is very different and allows for the creation of much more complex rules.
1.1.2. How Does Windup Simplify Migration?
Windup looks for common resources and highlight technologies and known “trouble spots” in migrating applications. The goal of Windup is to provide a high level view into relevant technologies in use within the application, and provide a consumable report for organizations to estimate, document, and migrate enterprise applications to Java EE and JBoss EAP.
These are some of the of the areas targetted by current core Windup rulesets:
| Ruleset | Description |
|---|---|
Java code |
Reads compiled Java files, determines if blacklisted classes are imported, and if so, continues to profile the resource. |
JSP code |
Reads JSP files, extracts the JSP imports and taglibs, and continues to profile the resource |
XML configuration |
Reads XML files into a DOM objects and continues to profile the resource. |
1.1.3. Follow Windup on Twitter!
Follow Windup on Twitter @JBossWindup for updates and more!
1.2. Features of Windup 2.0
| Shared Data Model |
Windup 2.0 creates a shared data model graph that provides the following benefits.
|
| Extensibility |
Windup 2.0 can be extended by developers, users, and 3rd-parties.
|
| Better Rules |
Windup 2.0 provides more powerful and complex rules.
|
| Automation |
Windup 2.0 has the ability to automate some of the migration processes.
|
| Work Estimation |
Estimates for the level of effort is based on the skills required and the classification of migration work needed.
|
| Better Reporting |
Windup 2.0 reports are now targeted for specific audiences.
|
1.3. Windup Processing Overview
Windup is a rule-based migration tool that allows you to write customized rules to analyze the APIs, technologies, and architectures used by the applications you plan to migrate. The Windup tool also executes its own core rules through all phases of the migration process.
The following is a high level conceptual overview of what happens within Windup when you execute the tool against your application or archive.
1.3.1. Discovery Phase
Wnen you run the windup-migrate-app command, Windup executes its own core rules to extract files from archives, decompile classes, and analyze the application. In this phase Windup builds a data model and stores component data and relationships in a graph database, which can then be queried and updated as needed by the migration rules and for reporting purposes.
For more information about the phases of rule execution and how to control rule dependencies, see Rule Execution Lifecycle.
For more information about the graph database components, see Windup Architectural Components.
1.3.2. Application Migration
The next step in the process is the execution of the migration rules. In this phase, the rules typically do not execute against the application input files. Instead, they execute against the graph database model. Windup rules are independent and decoupled and they communicate with each other using the graph database model. Rules query the graph database to obtain information needed to test the rule condition. They also update the data model with information based on the result of the rule execution. This allows rules to easily interact with other rules and enables the creation of very complex rules.
The Windup distribution contains a large number of migration rules, but in some cases, you may need to create additional custom rules for your specific implementation. Windup’s architecture allows you to create Java-based rule addons or XML rules and add easily add them to Windup. Custom rule creation is covered in the Windup Rules Development Guide.
1.3.3. Generate Findings Based on the Rule Execution Results
The final step in the process is to pull data from the graph database model to generate of reports and optionally generate scripts. Again, Windup uses rules to generate the final output.
By default, Windup generates the following reports at the end of the application migration process. The reports are located in the reports/ subdirectory of the output report path specified when you execute Windup:
-
Application Report: This report provides a summary of the total estimated effort, or story points, that are required for the migration. It also provides a detailed list of issues and suggested changes, broken down by archive or folder.
-
RuleProvider report: This is a detailed listing of the rule providers that fired when running Windup and whether any errors occurred.
-
Additional reports are generated that provide detailed line-by-line migration tips for individual files.
Windup can also generate scripts to automate migration processes based on the findings. For example, some configuration files are easily mapped and can be automatically generated as part of the migration process.
1.4. Get Involved
1.4.1. How can you help?
To help us make Windup cover most application constructs and server configurations, including yours, you can help with any of the following items. Some items require only a few minutes of your time!
-
Let us know what Windup migration rules should cover.
-
Provide example applications to test migration rules.
-
Identify application components and problem areas that may be difficult to migrate.
-
Write a short description of these problem migration areas.
-
Write a brief overview describing how to solve the problem migration areas.
-
-
Try Windup on your application. Be sure to report any issues you encounter.
-
You can contribute Windup rules.
-
Write a Windup rule add-on to automate a migration process.
-
Create a test for the new rule.
-
For details, see the Windup Rules Development Guide.
-
-
You can also contribute to the project source code.
-
Create a core rule.
-
Improve performance or efficiency.
-
See the_Windup Core Development Guide_ for information about how to configure your environment and set up the project.
-
Any level of involvement is greatly appreciated!
1.4.2. Helpful links
-
Windup Wiki: https://github.com/windup/windup/wiki
-
Windup documentation (generated from the Wiki documentation at the link above):
-
Windup Forums: https://community.jboss.org/en/windup
-
Windup Forums: https://developer.jboss.org/en/windup (inherited from Windup 0.x)
-
Windup Issue Tracker: https://issues.jboss.org/browse/WINDUP
-
Windup Users Mailing List: windup-users@lists.jboss.org
-
Windup Developers Mailing List: windup-dev@lists.jboss.org
-
Windup Commits Mailing List: windup-commits@lists.jboss.org
-
Windup on Twitter: @JBossWindup
1.5. Report Issues with Windup
Windup uses JIRA as its issue tracking system. If you encounter an issue executing Windup, please file a Windup JIRA Issue.
1.5.1. Create a JIRA Account
If you do not yet have a JIRA account, create one using the following procedure.
-
Open a browser to the following URL: https://issues.jboss.org/secure/Dashboard.jspa
-
Click the Sign Up link in the top right side of the page.
-
Enter your email address and click the
Confirm addressbutton. -
Follow the instructions sent to your email address.
1.5.2. Create a JIRA Issue
-
Open a browser to the following URL: https://issues.jboss.org/secure/CreateIssue!default.jspa.
-
If you have not yet logged in, click the Log In link at the top right side of the page.
-
Enter your credentials and click the
LOGINbutton. -
You are then redirected back to the Create Issue page.
-
-
Choose the following options and click the
Nextbutton.-
Project: Windup
-
Issue Type: Bug
-
-
On the next screen complete the following fields:
-
Summary: Enter a brief description of the problem or issue.
-
Environment: Provide the details of your operating system, version of Java, and any other pertinent information.
-
Description: Provide a detailed description of the issue. Be sure to include logs and exceptions traces.
-
-
Click the
Createbutton to create the JIRA issue. -
If the application or archive causing the issue does not contain sensitive information and you are comfortable sharing it with the Windup development team, attach it to the issue by choosing
More → Attach Files. You are provided with an option to restrict visibility to JBoss employees.
1.6. About the WINDUP_HOME Variable
This documentation uses the WINDUP_HOME replaceable value to denote the path to the Windup distribution. When you encounter this value in the documentation, be sure to replace it with the actual path to your Windup installation.
-
If you download and install the latest distribution of Windup from the JBoss Nexus repository,
WINDUP_HOMErefers to thewindup-distribution-2.0.0.VERSIONfolder extracted from the downloaded ZIP file. -
If you build Windup from GitHub source,
WINDUP_HOMErefers to thewindup-distribution-2.0.0-VERSIONfolder extracted from the Windup sourcedist/target/windup-distribution-2.0.0-VERSION.zipfile.
2. Get Started
2.1. Install Windup
-
Download the latest Windup ZIP distribution.
-
Extract the ZIP file in to a directory of your choice.
|
Note
|
If you used previous versions of Windup, delete the ${user.home}/.windup/ directory. Otherwise you may see errors like the following when you execute Windup:
Command: windup-migrate-app was not found
|
2.2. Execute Windup
2.2.1. Prerequisites
Before you begin, you must gather the following information.
-
Windup requires that you specify the fully qualified path of the application archive or folder you plan to migrate. This is passed using the
--inputargument on the command line. -
You also specify the fully qualified path to a folder that will contain the resulting report information. This path is passed using the
--outputargument on the command line.-
If the folder does not exist, it is created by Windup.
-
If the folder exists, you are prompted with the message:
Overwrite all contents of <OUTPUT_DIRECTORY> (anything already in the directory will be deleted)? [y/N]
Choose "y" if you want Windup to delete and recreate the directory.
-
If you are confident you want to overwrite the output directory, you can specify
--overwriteon the command line to automatically delete and recreate the directory.NoteBe careful not to specify a directory that contains important information!
-
-
You must also provide a list of the application packages to be evaluated.
-
In most cases, you are interested only in evaluating the custom application class packages and not the standard Java EE or 3rd party packages. For example, if the MyCustomApp application uses the package
com.mycustomapp, you provide that package using the--packagesargument on the command line. It is not necessary to provide the standard Java EE packages, likejava.utilorjavax.ejb. -
While you can provide package names for standard Java EE 3rd party software like
org.apache, it is usually best not to include them as they should not impact the migration effort. -
If you omit the
--packagesargument, every package in the application is scanned, resulting in very slow performance. It is best to provide the argument with one or more packages.
-
2.2.2. Start Windup
For information about the use of WINDUP_HOME in the instructions below, see About the WINDUP_HOME Variable.
-
Open a terminal and navigate to the
WINDUP_HOME/bindirectory -
Type the following command to start Windup:
For Linux:    WINDUP_HOME/bin $ ./windup
For Windows:  C:\WINDUP_HOME\bin> windup
-
You are presented with the following prompt.
Using Windup at WINDUP_HOME

 _       ___           __
| |     / (_)___  ____/ /_  ______
| | /| / / / __ \/ __  / / / / __ \
| |/ |/ / / / / / /_/ / /_/ / /_/ /
|__/|__/_/_/ /_/\__,_/\__,_/ .___/
                          /_/

JBoss Windup, version [ 2.0.0-VERSION ] - JBoss, by Red Hat, Inc. [ http://windup.jboss.org ]

[windup-distribution-2.0.0-VERSION]$
2.2.3. Run the windup-migrate-app Command
-
The syntax to evaluate an application using the Windup tool requires that you specify the location of the input archive or source code folder, the location of a folder to contain the output reporting information, and the application packages to evaluate. To evaluate an application archive, use the following syntax:
windup-migrate-app --input INPUT_ARCHIVE_OR_FOLDER --output OUTPUT_REPORT_DIRECTORY --packages PACKAGE_1 PACKAGE_2 PACKAGE_N
To run Windup against application source code, you must add the
--sourceMode trueargument:windup-migrate-app --sourceMode true --input INPUT_ARCHIVE_OR_FOLDER --output OUTPUT_REPORT_DIRECTORY --packages PACKAGE_1 PACKAGE_2 PACKAGE_N
Where:
INPUT_ARCHIVE_OR_FOLDER is the fully qualified application archive or source path
OUTPUT_REPORT_DIRECTORY is the fully qualified path to the folder that will contain the the report information produced by Windup.
NoteIf the OUTPUT_REPORT_DIRECTORY directory exists, you are prompted to overwrite the contents. If you respond "y", it is deleted and recreated by Windup, so be careful not to specify an output directory that contains important information! PACKAGE_1, PACKAGE_2, PACKAGE_N are the packages to be evaluated by Windup.
See Windup Command Examples below for concrete examples of Windup commands using source code directories and archives located in the Windup GitHub repository.
-
You should see the following result upon completion of the command:
***SUCCESS*** Windup execution successful!
-
To exit Windup, type:
exit
-
Open the
OUTPUT_REPORT_DIRECTORY/index.htmlfile in a browser to access the report. The following subdirectories in theOUTPUT_REPORT_DIRECTORYcontain the supporting information for the report:OUTPUT_REPORT_DIRECTORY/ graph/ renderedGraph/ reports/ stats/ index.html -
For details on how to evaluate the report data, see Review the Report.
2.2.4. Run Windup in Batch Mode
Windup can be also executed in batch mode within a shell or batch script using the --evaluate argument as follows.
-
Open a terminal and navigate to the WINDUP_HOME directory.
-
Type the following command to run Windup in batch mode:
For Linux:     $ bin/windup --evaluate "windup-migrate-app --input INPUT_ARCHIVE --output OUTPUT_REPORT --packages PACKAGE_1 PACKAGE_2 PACKAGE_N"
For Windows:   > bin\windup.bat --evaluate "windup-migrate-app --input INPUT_ARCHIVE --output OUTPUT_REPORT --packages PACKAGE_1 PACKAGE_2 PACKAGE_N"
2.2.5. Windup Help
To see the list of available parameters for the windup-migrate-app command, execute the following command in the Windup prompt:
man windup-migrate-app
2.2.6. Windup Command Examples
The following Windup command examples report against applications located in the Windup source test-files directory.
Source Code Example
The following command runs against the seam-booking-5.2 application source code. It evaluates all org.jboss.seam packages and creates a folder named 'seam-booking-report' in the /home/username/windup-reports/ directory to contain the reporting output.
windup-migrate-app --sourceMode true --input /home/username/windup-source/test-files/seam-booking-5.2/ --output /home/username/windup-reports/seam-booking-report --packages org.jboss.seam
Archive Example
The following command runs against the jee-example-app-1.0.0.ear EAR archive. It evaluates all com.acme and org.apache packages and creates a folder named 'jee-example-app-1.0.0.ear-report' in the /home/username/windup-reports/ directory to contain the reporting output.
windup-migrate-app --input /home/username/windup-source/test-files/jee-example-app-1.0.0.ear/ --output /home/username/windup-reports/jee-example-app-1.0.0.ear-report --packages com.acme org.apache
Windup Batch Example
The following Windup batch command runs against the jee-example-app-1.0.0.ear EAR archive. It evaluates all com.acme and org.apache packages and creates a folder named 'jee-example-app-1.0.0.ear-report' in the /home/username/windup-reports/ directory to contain the reporting output.
For Linux: $ bin/windup --evaluate "windup-migrate-app --input /home/username/windup-source/test-files/jee-example-app-1.0.0.ear/ --output /home/username/windup-reports/jee-example-app-1.0.0.ear-report --packages com.acme org.apache"
For Windows: > bin\windup.bat --evaluate "windup-migrate-app --input \windup-source\test-files\jee-example-app-1.0.0.ear --output \windup-reports\jee-example-app-1.0.0.ear-report --packages com.acme org.apache
Windup Quickstart Examples
For more concrete examples, see the Windup quickstarts located on GitHub here: https://github.com/windup/windup-quickstarts. If you prefer, you can download the 2.0.0.Alpha1 release ZIP or TAR distribution of the quickstarts.
The quickstarts provide examples of Java-based and XML-based rule addons you can run and test using Windup. The README instructions provide a step-by-step guide to run the quickstart example. You can also look through the code examples and use them as a starting point for creating your own rule addons.
2.3. Review the Report
2.3.1. About the Report
When you execute Windup, the report is generated in the OUTPUT_REPORT_DIRECTORY you specify for the --output argument in the command line. This output directory contains the following files and subdirectories:
-
index.html: This is the landing page for the report. -
archives/: Contains the archives extracted from the application -
graph/: Contains binary graph database files -
reports/: This directory contains the generated HTML report files -
stats/: Contains Windup performance statistics
The examples below use the test-files/jee-example-app-1.0.0.ear located in the Windup GitHub source repository for input and specify the com.acme and org.apache package name prefixes to scan. For example:
windup-migrate-app --input /home/username/windup-source/test-files/jee-example-app-1.0.0.ear/ --output /home/username/windup-reports/jee-example-app-1.0.0.ear-report --packages com.acme org.apache
2.3.2. Open the Report
Use your favorite browser to open the index.html file located in the output report directory. You should see something like the following:
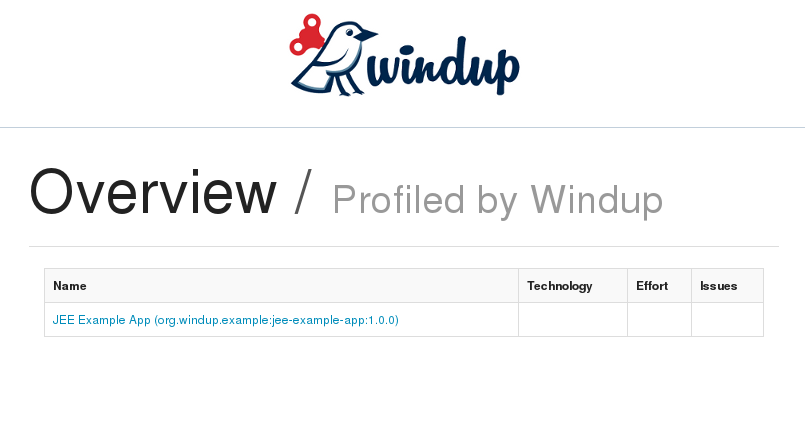
Click on the link under the Name column to view the Windup application report page.
2.3.3. Report Sections
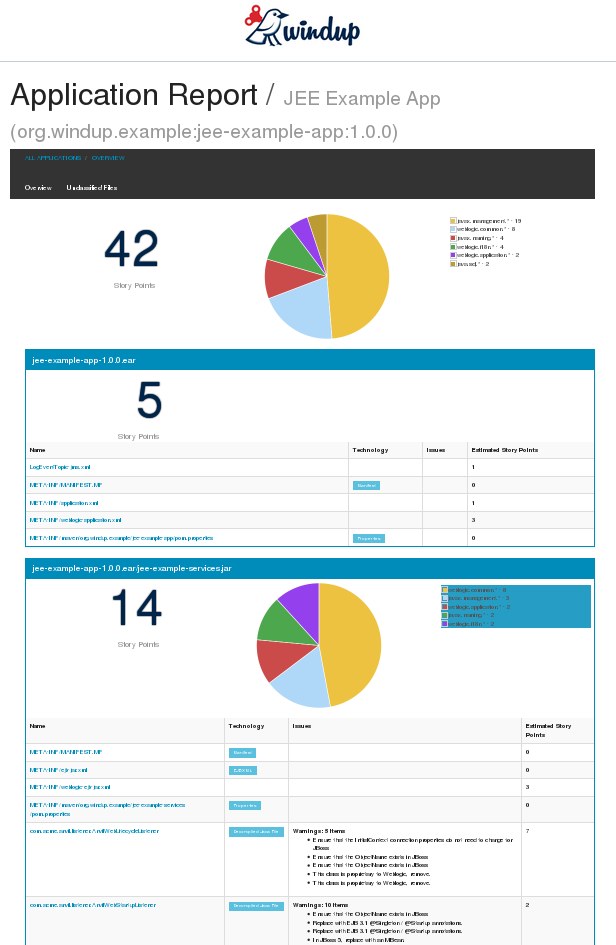
Application Report Page
The first section of the application report page summarizes the migration effort. It provides the total Story Points and a graphically displays the effort by technology. A Story Point is a term commonly used in Scrum Agile software development methodology to estimate the level of effort needed to implement a feature or change. It does not necessarily translate to man-hours, but the value should be consistent across tasks.
-
The migration of the JEE Example App EAR is assigned a total of 42 story points. A pie chart shows the breakdown of story points by package.
-
This is followed by a section for each of the archives contained in the EAR. It provides the total of the story points assigned to the archive and lists the files contained in archive along with the warnings and story point assigned to each file.
The following is an example of a Windup Application Report.
Archive Analysis Sections
Each archive summary begins with a total of the story points assigned to its migration, followed by a table detailing the changes required for each file in the archive. The report contains the following columns.
- Name
-
The name of the file being analyzed
- Technology
-
The type of file being analyzed. For example:
-
Java Source
-
Decompiled Java File
-
Manifest
-
Properties
-
EJB XML
-
Spring XML
-
Web XML
-
Hibernate Cfg
-
Hibernate Mapping
-
- Issues
-
Warnings about areas of code that need review or changes.
- Estimated Story Points
-
Level of effort required for migrating the file.
The following is an example of the archive analysis summary section of a Windup Report. In this example, it’s the analysis of the WINDUP_SOURCE/test-files/jee-example-app-1.0.0.ear/jee-example-services.jar.
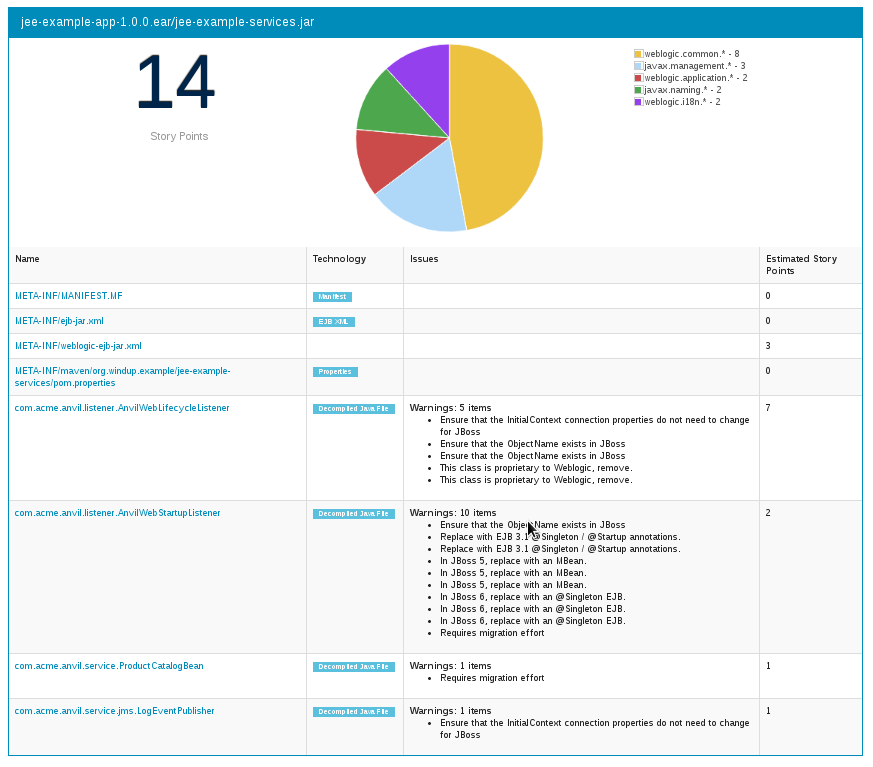
File Analysis Pages
The analysis of the jee-example-services.jar lists the files in the JAR and the warnings and story points assigned to each one. Notice the com.acme.anvil.listener.AnvilWebLifecycleListener file has 5 warnings and is assigned 7 story points. Click on the file to see the detail.
-
The Information section provides a summary of the story points and notes that the file was decompiled by Windup.
-
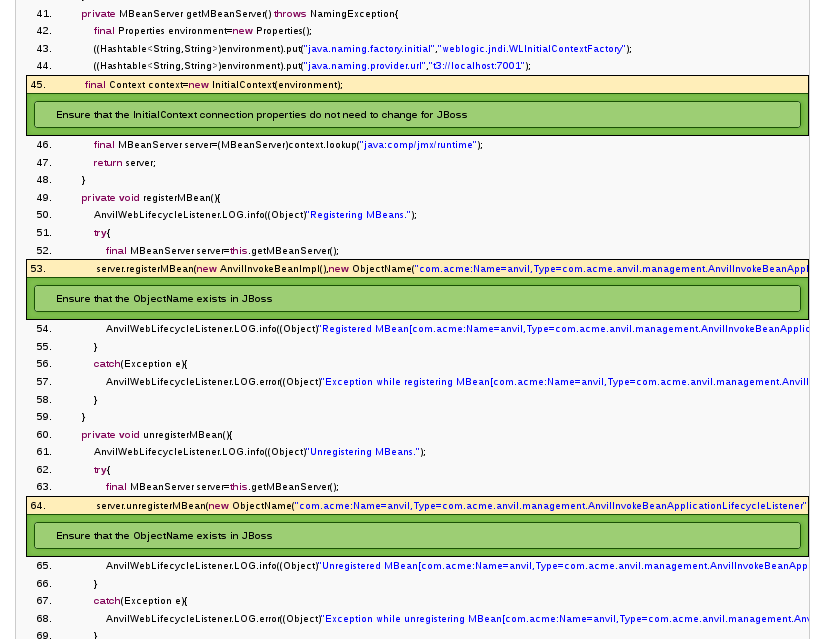
This is followed by the file source code listing. Warnings appear in the file at the point where migration is required.
In this example, warnings appear at the import of weblogic.application.ApplicationLifecycleEvent and report that the class is proprietary to WebLogic and must be removed.
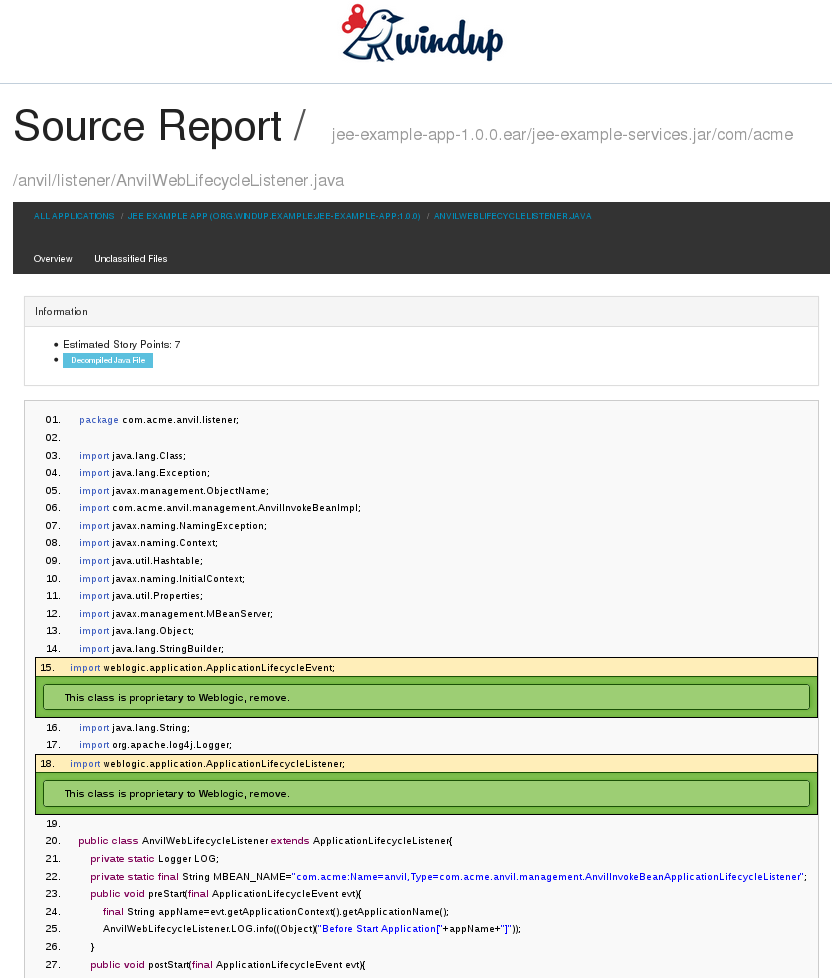
Later in the code, warnings appear for the creation of the InitialContext and for the object name when registering and unregistering an MBeans
2.3.4. Additional Reports
Explore the Windup OUTPUT_REPORT_DIRECTORY/reports folder to find additional reporting information.
Rule Provider Execution Report
The OUTPUT_REPORT_DIRECTORY/reports/windup_ruleproviders.html page provides the list of rule providers that executed when running the Windup migration command against the application.

Rule Provider Execution Report
The OUTPUT_REPORT_DIRECTORY/reports/windup_ruleproviders.html page provides the list of rule providers that executed when running the Windup migration command against the application.
Individual File Analysis Reports
You can directly access the the file analysis report pages described above by browsing for them by name in the OUTPUT_REPORT_DIRECTORY/reports/ directory. Because the same common file names can exist in multiple archives, for example "manifest.mf" or "web.xml", Windup adds a unique numeric suffix to each report file name.
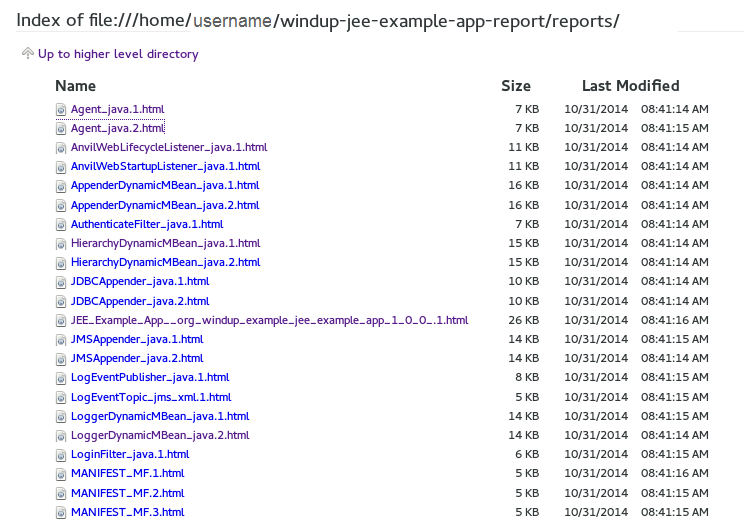
include::http://windup.github.io/windup/docs/javadoc/latest/[Windup API JavaDoc reference]: The JavaDoc can serve as a reference for creating Java-based rule addons.
3. Understand the Rule Processing
3.1. Windup Processing Overview
Windup is a rule-based migration tool that allows you to write customized rules to analyze the APIs, technologies, and architectures used by the applications you plan to migrate. The Windup tool also executes its own core rules through all phases of the migration process.
The following is a high level conceptual overview of what happens within Windup when you execute the tool against your application or archive.
3.1.1. Discovery Phase
Wnen you run the windup-migrate-app command, Windup executes its own core rules to extract files from archives, decompile classes, and analyze the application. In this phase Windup builds a data model and stores component data and relationships in a graph database, which can then be queried and updated as needed by the migration rules and for reporting purposes.
For more information about the phases of rule execution and how to control rule dependencies, see Rule Execution Lifecycle.
For more information about the graph database components, see Windup Architectural Components.
3.1.2. Application Migration
The next step in the process is the execution of the migration rules. In this phase, the rules typically do not execute against the application input files. Instead, they execute against the graph database model. Windup rules are independent and decoupled and they communicate with each other using the graph database model. Rules query the graph database to obtain information needed to test the rule condition. They also update the data model with information based on the result of the rule execution. This allows rules to easily interact with other rules and enables the creation of very complex rules.
The Windup distribution contains a large number of migration rules, but in some cases, you may need to create additional custom rules for your specific implementation. Windup’s architecture allows you to create Java-based rule addons or XML rules and add easily add them to Windup. Custom rule creation is covered in the Windup Rules Development Guide.
3.1.3. Generate Findings Based on the Rule Execution Results
The final step in the process is to pull data from the graph database model to generate of reports and optionally generate scripts. Again, Windup uses rules to generate the final output.
By default, Windup generates the following reports at the end of the application migration process. The reports are located in the reports/ subdirectory of the output report path specified when you execute Windup:
-
Application Report: This report provides a summary of the total estimated effort, or story points, that are required for the migration. It also provides a detailed list of issues and suggested changes, broken down by archive or folder.
-
RuleProvider report: This is a detailed listing of the rule providers that fired when running Windup and whether any errors occurred.
-
Additional reports are generated that provide detailed line-by-line migration tips for individual files.
Windup can also generate scripts to automate migration processes based on the findings. For example, some configuration files are easily mapped and can be automatically generated as part of the migration process.
3.2. Rule Execution Lifecycle
3.2.1. Rule Lifecycle
Windup executes each rule in a sequential order. The following sections describe the phases of rule execution and how rules may specify that one or more other rules must be executed before or after they are run.
For a graphical overview of rule processing, see this diagram.
3.2.2. Rule Phases
INFO: Loaded [67] org.jboss.windup.config.WindupRuleProvider [
org.jboss.windup.config.phase.Implicit
org.jboss.windup.config.phase.Initialization
org.jboss.windup.config.phase.Discovery
org.jboss.windup.config.phase.ArchiveExtraction
org.jboss.windup.config.phase.ArchiveMetadataExtraction
org.jboss.windup.config.phase.ClassifyFileTypes
org.jboss.windup.config.phase.DiscoverProjectStructure
org.jboss.windup.config.phase.Decompilation
org.jboss.windup.config.phase.InitialAnalysis
org.jboss.windup.config.phase.MigrationRules
org.jboss.windup.config.phase.PostMigrationRules
org.jboss.windup.config.phase.PreReportGeneration
org.jboss.windup.config.phase.ReportGeneration
org.jboss.windup.config.phase.PostReportGeneration
org.jboss.windup.config.phase.ReportRendering
org.jboss.windup.config.phase.PostReportRendering
org.jboss.windup.config.phase.Finalize
org.jboss.windup.config.phase.PostFinalize
]
By default, a rule runs during the MigrationRules phase. However, a rule may require certain processing or actions to occur before it executes, such as the extraction of archives and scanning of java or XML files.
Rule phases provide a way for rule authors to specify and control in
which phase of the rule lifecycle the rule should execute. This is done
by overriding the WindupRuleProvider.getPhase() method. The following
example specifies this rule should execute during the InitialAnalysis rule phase.
@Override
public RulePhase getPhase() {
    return InitialAnalysis.class;
}
The following is the list of rule phases as defined in the RulePhase
enum class. Note that there are also PRE_ processing and POST_
processing phases for each of the following rule phases.
- DISCOVERY
-
This phase is called during resource discovery. Static files are scanned by their basic properties, for example, the name, extension, location, and fully qualified Java class name. Archives are unzipped in this phase. Typically, any rule that only puts data into the graph is executed during this phase.
- INITIAL_ANALYSIS
-
This phase is called to perform a basic analysis of the files content. It extracts all method names from class files, extracts metadata, such as the XML namespace and root element, from XML files.
- COMPOSITION
-
This phase is called to perform high-level composition operations on the graph. For example, it may link items found in XML files to the related Java classes or references to server resources in Java classes.
- MIGRATION_RULES
-
This is the default phase for all rules unless overridden. During this phase, migration rules attach data to the graph associated with migration. This could include: - Hints to migrators for manual migration - Automated migration of schemas or source segments - Blacklists to indicate vendor specific APIs.
- REPORT_GENERATION
-
During this phase, reporting visitors produce report data in the graph that will later be used by the report rendering phase.
- REPORT_RENDERING
-
This is the phase that renders the report.
- FINALIZE
-
This phase is called to clean up resources and close streams.
For more information about rule phases, see the RulePhase Javadoc.
3.2.3. Execute Before and Execute After
A rule may specify that one or more rules must be executed before it is run. In this case, all named rules will be fired in the order specified before executing the the current rule.
@Override
public List<Class<? extends WindupRuleProvider>> getExecuteBefore()
{
   return asClassList(RuleToFireBefore.class);
}
A rule may also specify that one or more rules must be executed after it is run. In this case, all named rules will be fired in the order specified after executing the the current rule.
@Override
public List<Class<? extends WindupRuleProvider>> getExecuteAfter()
{
    return asClassList(RuleToFireAfter.class);
}
3.3. Rule Story Points
3.3.1. What are Story Points?
Story points are an abstract metric used in Scrum methodology to estimate the level of effort for various tasks. They are based on a modified Fibonacci sequence. In a similar manner, Windup uses story points to express the level of effort needed to migrate particular application constructs, and in a sum, the application as a whole.
3.3.2. How to Estimate Story Points in a Rule
Estimating story points for a rule can be tricky. The following are general guidelines or suggestions to use when estimating the level of effort required for a rule.
| Level of Effort | Story Points | Description |
|---|---|---|
Lift and Shift |
0 |
The code or file is standards-based and requires no effort. |
Mapped |
1- 2 per file |
There is a standard mapping algorithm to port the code or file. The number of story points required is small, but dependent on the number of files to port. |
Custom |
5 - 20 per change or component |
The number of story points required to modify and rewrite code depends on the complexity of the change, the number of unknown imports, the size of the files, and the number of components. The following are examples of how to estimate story points.
|
4. Create and Test Java Rule Addons
4.1. Install and Configure Maven
If you plan to contribute to the core code base or create Java-based rule addons, you must first install and configure Maven to build Windup from source.
4.1.1. Download and Install Maven
If you plan to use Eclipse Luna (4.4) to build Windup, you can skip this step and go directly to the section entitled Configure Maven to Build Windup. This version of Eclipse embeds Maven 3.2.1 so you do not need to install it separately.
If you plan to run Maven using the command line or plan to use Red Hat JBoss Developer Studio 7.1.1 or an older version of Eclipse, you must install Maven 3.1.1. or later.
-
Go to Apache Maven Project - Download Maven and download the latest distribution for your operating system.
-
See the Maven documentation for information on how to download and install Apache Maven for your operating system.
4.1.2. Configure the Maven Installation in Your IDE
JBoss Developer Studio 7.1.1 is built upon Eclipse Kepler (4.3), which embeds Maven 3.0.4. If you plan to use JBoss Developer Studio 7.1.1 or an Eclipse version earier than Eclipse Luna (4.4), you must replace the embedded 3.0.4 version of Maven with this newer version.
-
From the menu, choose
Window-→Preferences. -
Expand
Mavenand click onInstallations. -
Uncheck
Embedded (3.0.4/1.4.0.20130531-2315) -
Click
Addand navigate to your Maven install directory. Select it and clickOK. -
Make sure the new external Maven installation is checked and click
OKto return to JBoss Developer Studio.
Note: If you use another IDE, refer to the product documentation to update the Maven installation.
4.1.3. Configure Maven to Build Windup
Windup uses artifacts located in the JBoss Nexus repository. You must configure Maven to use this repository before you build Windup.
-
Open your
${user.home}/.m2/settings.xmlfile for editing. -
Copy the following
jboss-nexus-repositoryprofile XML prior to the ending</profiles>element.<profile> <id>jboss-nexus-repository</id> <repositories> <repository> <id>jboss-nexus-repository</id> <url>http://repository.jboss.org/nexus/content/groups/public/</url> <releases> <enabled>true</enabled> </releases> <snapshots> <enabled>true</enabled> </snapshots> </repository> </repositories> <pluginRepositories> <pluginRepository> <id>jboss-nexus-plugin-repository</id> <url>http://repository.jboss.org/nexus/content/groups/public/</url> <releases> <enabled>true</enabled> </releases> <snapshots> <enabled>true</enabled> </snapshots> </pluginRepository> </pluginRepositories> </profile> -
Copy the following XML prior to the ending
</activeprofiles>element to make the profile active.<activeProfile>jboss-nexus-repository</activeProfile>
You are now configured to build Windup.
4.2. Java-based Rule Structure
TODO: * Add a how-to for compound rules, nested rules, rules over multiple sources, negative queries (not matched by anything). Points] WINDUP-255
4.2.1. Windup Rule Provider
Windup rules are based on OCPsoft Rewrite, an open source routing and URL rewriting solution for Servlets, Java Web Frameworks, and Java EE. The rewrite framework allows you to create rule providers and rules in an easy to read format.
Windup rule add-ons must extend the WindupRuleProvider class.
-
If the rule should run in a phase other than the default MIGRATION_PHASE, you must implement the getPhase() method and specify in which Windup lifecycle phase the rule should be executed. For more information about rule phases, see Rule Execution Lifecycle.
-
Rules are added using the getConfiguration(GraphContext context) method. This method is inherited from the OCPsoft Rewrite interface org.ocpsoft.rewrite.config.ConfigurationProvider. Rules are discussed in more detail later.
-
If other rules must execute after or before the rules in this provider, you must provide the list of WindupRuleProvider classes using the getExecuteAfter() or getExecuteAfter() methods.
The following is an example of a simple Java-based rule add-on.
public class ExampleRuleProvider extends WindupRuleProvider
{
    @Override public RulePhase getPhase(){
        return RulePhase.DISCOVERY;
    }

    // @formatter:off
    @Override
    public Configuration getConfiguration(GraphContext context)
    {
        return ConfigurationBuilder.begin()
        .addRule()
        .when(
            // Some implementation of GraphCondition.
            Query.find(...)....
        )
       .perform(
            ...
       );
    }
    // @formatter:on
    // (@formatter:off/on prevents Eclipse from formatting the rules.)
}
4.2.2. Add Rule Code Structure
Like most rule-based frameworks, Windup rules consist of the following:
-
Condition: This is the when(condition) that determines if the rule should execute.
-
Operation: This defines what to perform() if the condition is met.
Rules consist of the when part, the perform, the otherwise part, and some others, all of which are optional.
when()
.when(Query.fromType(XmlMetaFacetModel.class))In the .when() part, the rule typically queries the graph, using the
Query API. Results of the query are put on variables stack
(Variables), many times indirectly through the querying API.
Other way to fill a when part is subclassing the GraphCondition.
Actually, Query also implements it, and is only a convenient way to
create a condition.
Last noticable but important feature is the ability to use Gremlin queries. See Gremlin docs for reference manual.
perform()
.perform(
   new AbstractIterationOperation<XmlMetaFacetModel>(XmlMetaFacetModel.class, "xml")
   {
      public void perform(GraphRewrite event, EvaluationContext context, XmlMetaFacetModel model)
      {
         // for each model, do something
      }
   }
)
In the .perform() part, the rule typically iterates over the items of interest
(Java files, XML files, querying services, …), processes them, and
writes the findings into the graph.
For that, various operations are available. These are subclasses of
GraphOperation. You can also implement your own. See
Rules-Operations[Rules Operations] for more info. Again, there are
several convenient implementations for constructs like iteration
(Iteration).
Iteration
.perform(
    Iteration.over(XmlMetaFacetModel.class, "xmlModels").as("xml")
    .when(...)
    .perform(
        new AbstractIterationOperation<XmlMetaFacetModel>(XmlMetaFacetModel.class, "xml"){
            public void perform(GraphRewrite event, EvaluationContext context, XmlMetaFacetModel xmlFacetModel)
            {
            }
        })
    .otherwise(
        new AbstractIterationOperation<XmlMetaFacetModel>(XmlMetaFacetModel.class, "xml"){
            public void perform(GraphRewrite event, EvaluationContext context, XmlMetaFacetModel payload)
                { ... }
        })
    .endIteration()
Nested iterations
TODO
otherwise
Windup rules inherit the rule constructs from OCP Rewrite. For example,
.otherwise() Gives you a chance to perform something in case the
conditions in .when() return false (e.g. they do not match anything).
For more information, see OCP Rewrite web.
.otherwise(
   new AbstractIterationOperation<XmlMetaFacetModel>(XmlMetaFacetModel.class, "xml")
   {
      public void perform(GraphRewrite event, EvaluationContext context, XmlMetaFacetModel model)
      {
         // for each model, do something altenate
      }
   }
)
Where
TODO
Metadata
Rules can specify metadata. Currently, the only appearing in some rules,
and not actually used, is RuleMetadata.CATEGORY.
.withMetadata(RuleMetadata.CATEGORY, "Basic").withMetadata() is basically putting key/value to a
Map<Object, Object>.
4.2.3. Available utilities
For a list of what key services and constructs can be used in the rule, see Available Rules Utilities.
4.3. Basic Rule Execution Flow Patterns
SGILDA: TODO - Need some links to github to the respective example files.
4.3.1. operation(); - single operation
When no iteration or condition is needed.
Example: [CopyJavaConfigToGraphRuleProvider](rules-java/src/main/java/org/jboss/windup/rules/apps/java/config/CopyJavaConfigToGraphRuleProvider.java)
return ConfigurationBuilder.begin()
    .addRule()
    .perform(new GraphOperation(){
        @Override
        public void perform(GraphRewrite event, EvaluationContext context){
            ...
        }
    });
4.3.2. if( … ){ operation(); } - single conditional operation
return ConfigurationBuilder.begin()
    .addRule()
    .when( ... )
    .perform(new GraphOperation(){
        @Override
        public void perform(GraphRewrite event, EvaluationContext context){
            ...
        }
    });
4.3.3. for( FooModel.class ){ … } - Single iteration
For simple iterations, IteratingRuleProvider can be used, which makes the perform a bit less verbose:
public class ComputeArchivesSHA512 extends IteratingRuleProvider<ArchiveModel>
{
    public ConditionBuilder when() {
        return Query.find(ArchiveModel.class);
    }

    // @formatter:off
    public void perform( GraphRewrite event, EvaluationContext context, ArchiveModel archive ){
        try( InputStream is = archive.asInputStream() ){
            String hash = DigestUtils.sha512Hex(is);
            archive.asVertex().setProperty(KEY_SHA512, hash);
        }
        catch( IOException e ){
            throw new WindupException("Failed to read archive: " + archive.getFilePath() +
                "\n    Due to: " + e.getMessage(), e);
        }
    }
    // @formatter:on

    @Override public String toStringPerform() { return this.getClass().getSimpleName(); }
}
4.3.4. if( … ){ for( … ) } - conditional iteration
return ConfigurationBuilder.begin()
    .addRule()
    .when(
        new GraphCondition(){ ... }
    ).perform(
        Iteration.over(ArchiveModel.class)
            .perform( ... )
    )
4.3.5. for( … ){ if( … ){ … } } - iteration with a condition
return ConfigurationBuilder.begin()
.addRule()
    .when(
        // Stores all ArchiveModel's into variables stack, under that type.
        Query.find(ArchiveModel.class)
    ).perform(
        Iteration.over(ArchiveModel.class) // Picks up ArchiveModel's from the varstack.
            .when(new AbstractIterationFilter<ArchiveModel>(){
                @Override
                public boolean evaluate(GraphRewrite event, EvaluationContext context, ArchiveModel payload)
                {
                    return payload.getProjectModel() == null;
                }
                @Override
                public String toString()
                {
                    return "ProjectModel == null";
                }
            })
            .perform( ... )
4.3.6. for( … ){ for( … ) { … } } - nested iterations
4.4. Create a Basic Java-based Rule Add-on
You can create a rule using Java or XML. This topic describes how to create a rule add-on using Java.
4.4.1. Prerequisites
-
You must Install Windup.
-
Be sure you Install and Configure Maven.
-
Before you begin, may want also want to be familiar with the following documentation:
-
Windup rules are based on the ocpsoft rewrite project. You can find more information about ocpsoft rewrite here: http://ocpsoft.org/rewrite/
-
The JavaDoc for the Windup API is located here: http://windup.github.io/windup/docs/javadoc/latest/
-
|
Note
|
Working examples of Java-based rules can be found in the Windup quickstarts GitHub repository located here: https://github.com/windup/windup-quickstarts |
4.4.2. Create a Rule Add-on
Create a Maven Project
Create a new Maven Java Project. These instructions will refer to the project folder location with the replaceable variable 'RULE_PROJECT_HOME'. Modify the project pom.xml file as follows
-
Add the following properties:
<properties> <project.build.sourceEncoding>UTF-8</project.build.sourceEncoding> <maven.compiler.source>1.7</maven.compiler.source> <maven.compiler.target>1.7</maven.compiler.target> <version.windup>2.0.0.VERSION</version.windup> <version.forge>2.12.1.Final</version.forge> </properties> -
Add a dependency management section for the Windup BOM.
<dependencyManagement> <dependencies> <!-- Windup BOM --> <dependency> <groupId>org.jboss.windup</groupId> <artifactId>windup-bom</artifactId> <version>${version.windup}</version> <type>pom</type> <scope>import</scope> </dependency> </dependencies> </dependencyManagement> -
Add a
<dependencies>section to include Windup, rulesets, and test dependencies required by your rule add-on. Windup is a Forge/Furnace based application and has a modular design, so the dependencies will vary depending on the Windup APIs used by the rule. For more information on Windup dependencies, see Windup Dependencies.The following are examples of some dependencies you may need for your rule add-on.
<!-- Windup API dependencies --> <dependency> <groupId>org.jboss.windup.graph</groupId> <artifactId>windup-graph</artifactId> <classifier>forge-addon</classifier> <scope>provided</scope> </dependency> <dependency> <groupId>org.jboss.windup.config</groupId> <artifactId>windup-config</artifactId> <classifier>forge-addon</classifier> <scope>provided</scope> </dependency> <dependency> <groupId>org.jboss.windup.ext</groupId> <artifactId>windup-config-groovy</artifactId> <classifier>forge-addon</classifier> <scope>provided</scope> </dependency> <dependency> <groupId>org.jboss.windup.utils</groupId> <artifactId>utils</artifactId> <classifier>forge-addon</classifier> <scope>provided</scope> </dependency> <dependency> <groupId>org.jboss.windup.reporting</groupId> <artifactId>windup-reporting</artifactId> <classifier>forge-addon</classifier> <scope>provided</scope> </dependency> <!-- Dependencies on other rulesets --> <dependency> <groupId>org.jboss.windup.rules.apps</groupId> <artifactId>rules-java</artifactId> <classifier>forge-addon</classifier> <scope>provided</scope> </dependency> <dependency> <groupId>org.jboss.forge.furnace.container</groupId> <artifactId>cdi-api</artifactId> <scope>provided</scope> </dependency> <dependency> <groupId>org.jboss.forge.furnace.container</groupId> <artifactId>cdi</artifactId> <classifier>forge-addon</classifier> <scope>provided</scope> </dependency> <!-- Test dependencies --> <dependency> <groupId>org.jboss.forge.furnace.test</groupId> <artifactId>furnace-test-harness</artifactId> <scope>test</scope> </dependency> <dependency> <groupId>org.jboss.forge.furnace.test</groupId> <artifactId>arquillian-furnace-classpath</artifactId> <scope>test</scope> </dependency> <dependency> <groupId>junit</groupId> <artifactId>junit</artifactId> <version>4.11</version> <type>jar</type> </dependency> <dependency> <groupId>org.jboss.windup.exec</groupId> <artifactId>windup-exec</artifactId> <classifier>forge-addon</classifier> <scope>test</scope> </dependency> -
Add the
<plugins>section to make it a Forge add-on.<plugins> <!-- The following plugins make this artifact a Forge add-on. --> <plugin> <groupId>org.jboss.forge.furnace</groupId> <artifactId>furnace-maven-plugin</artifactId> <version>${version.forge}</version> <executions> <execution> <id>generate-dot</id> <phase>prepare-package</phase> <goals> <goal>generate-dot</goal> </goals> <configuration> <attach>true</attach> </configuration> </execution> </executions> </plugin> <plugin> <artifactId>maven-jar-plugin</artifactId> <executions> <execution> <id>create-forge-addon</id> <phase>package</phase> <goals> <goal>jar</goal> </goals> <configuration> <classifier>forge-addon</classifier> </configuration> </execution> </executions> </plugin> </plugins>
Create the Java RuleProvider
-
Add
beans.xmlfile toMETA-INF/dir in resources - typically,$project-dir/src/main/resources/META-INF/beans.xml. This file can be empty. It tells CDI to scan your addon for CDI beans. -
Within your Maven project, create a Java class that extends the
WindupRuleProviderclass. It is suggested that you end the name of the class withRuleProvider. For example:public class MyCustomRuleProvider extends WindupRuleProvider { } -
If the rule provider must run in a phase other than the default
MIGRATION_RULESphase, override the phase using thegetPhase()method. For example, you may want the rule provider to perform a task during the initial DISCOVERY phase, for example, to ignore files with a specific name or extension.@Override public RulePhase getPhase() { return RulePhase.DISCOVERY; }For more information about rule phases, see Rules Execution Lifecycles.
-
To control the order in which the rule is executed, implement the
getExecuteBefore()orgetExecuteAfter()method.List<Class<? extends WindupRuleProvider>> executeBeforeList = new ArrayList<>(); @Override public List<Class<? extends WindupRuleProvider>> getExecuteBefore() { return executeBeforeList.add(RuleToFireBefore.class); }List<Class<? extends WindupRuleProvider>> executeAfterList = new ArrayList<>(); @Override public List<Class<? extends WindupRuleProvider>> getExecuteAfter() { return executeAfterList.add(RuleToFireAfter.class); } -
Finally, add the rule or rules to the rule provider.
-
High-level Conditions and Operations
The following is a specific high-level rule which uses high-level conditions (
JavaClass) and operations (Classification). See the documentation of those conditions and operations for the details.@Override public Configuration getConfiguration(GraphContext context) { return ConfigurationBuilder.begin() .addRule() .when( JavaClass.references("weblogic.servlet.annotation.WLServlet").at(TypeReferenceLocation.ANNOTATION) ) .perform( Classification.as("WebLogic @WLServlet") .with(Link.to("Java EE 6 @WebServlet", "https://access.redhat.com/documentation/en-US/JBoss_Enterprise_Application_Platform/index.html")) .withEffort(0) .and(Hint.withText("Migrate to Java EE 6 @WebServlet.").withEffort(8)) ); }For more examples of rule providers, see the BaseConfig.java rule.
-
Low-level Conditions and Operations
As you can see, the conditions and operations above are Java-specific. They come with the
Java Basicruleset. The list of existing rulesets will be part of the project documentation. Each ruleset will be accompanied with a documentation for its `Condition`s and `Operation`s (and also `Model`s).These high-level elements provided by rulesets may cover majority of cases, but not all. Then, you will need to dive into the mid-level Windup building elements.
-
Mid-level Conditions and Operations
-
4.4.3. Install the Java-based Rule Add-on
The easiest and fastest way to build the rule add-on, install it into the local Maven repository, and install it into Windup as a rule add-on is to use the Windup addon-build-and-install command.
-
If you have not started Windup, follow the instructions to Execute Windup.
-
At the Windup console prompt, enter the
addon-build-and-installcommand:addon-build-and-install --projectRoot RULE_PROJECT_HOME
-
You should see the following result.
***SUCCESS*** Addon MyCustomRuleProvider:::2.0.0.VERSION was installed successfully.
4.4.4. Test the Java-based Rule Add-on
Test the Java-based rule add-on against your application file by running the windup-migrate-app command in the Windup console prompt.
The command uses this syntax:
windup-migrate-app [--sourceMode true] --input INPUT_ARCHIVE_OR_FOLDER --output OUTPUT_REPORT_DIRECTORY --packages PACKAGE_1 PACKAGE_2 PACKAGE_N
You should see the following result:
***SUCCESS*** Windup report created: QUICKSTART_HOME/windup-reports-java/index.html
For more information and examples of how to run Windup, see: Execute Windup
4.4.5. Review the Output Report
-
Open OUTPUT_REPORT_DIRECTORY /index.html file in a browser.
-
You are presented with an Overview page containing the application profiles.
-
Click on the application link to review the detail page. Check to be sure the warning messages, links, and story points match what you expect to see.
TBD.
-
Models
-
Rules
-
Conditions, Operations
-
Variables
-
-
Inter-rule action
-
-
Short IDs - WINDUP-216 === Create an Advanced Ruleset
-
-
Create the Forge add-on
-
Add the dependencies you need
-
Create the service with your functionality, if needed
-
Create the rules (Add a the LINK)
-
Add the information to the report (Add a the LINK)
5. Create and Test XML Rules
5.1. Create a Basic XML Rule
You can create a rule addon using Java or a rule using XML or Groovy. This topic describes how to create a rule using XML.
5.1.1. Prerequisites
-
You should have already installed Windup.
-
Before you begin, you may also want to be familiar with the following documentation:
-
Windup rules are based on the ocpsoft rewrite project. You can find more information about ocpsoft rewrite here: http://ocpsoft.org/rewrite/
-
The JavaDoc for the Windup API is located here: http://windup.github.io/windup/docs/javadoc/latest/
-
The XML rule schema is located here: https://github.com/windup/windup/blob/master/config-xml/rule-schema.xsd.
-
5.1.2. File Naming Convention for XML Rules
You must name the file containing an XML rule with the .windup.xml extension. Windup identifies files with this extension as XML-base rules, so be sure to use this naming convention, otherwise the rule will not be evaluated!
5.1.3. Basic XML Rule Template
XML rules consist of conditions and actions and follow the familiar "if/then/else" construct:
when(condition)
    perform(action)
otherwise
    perform(action)
The following is the basic syntax for XML rules.
<?xml version="1.0"?>
<ruleset xmlns="http://windup.jboss.org/v1/xml" id="XmlFileMappings">
    <phase>
        <!-- The phase in which to run the rules -->
    </phase>
    <rules>
        <rule>
            <when>
                <!-- Test a condition... -->
            </when>
            <perform>
                <!-- Perform this action when condition is satisfied -->
            </perform>
            <otherwise>
                <!-- Perform this action when condition is not satisfied -->
            </otherwise>
        </rule>
      <rules>
    </ruleset>
5.1.4. Create the Rule When Condition
The syntax is dependent on whether you are creating a rule to evaluate Java class, an XML file, a project, or file content and is described in more detail here: XML Rule - When Condition Syntax
5.1.5. Create the Rule Perform Action
Operations allowed in the perform section of the rule include the classification of application resources, in-line hints for migration steps, links to migration information, and project lineitem reporting. The syntax is described in detail here: XML Rule - Perform Action Syntax.
5.2. XML Rule - When Condition Syntax
Conditions allowed in the when portion of a rule must extend GraphOperaton and currently include evaluation of Java classes, XML files, projects, and file content. Because XML rules are modeled after the Java-based rule addons, links to JavaDocs for the related Java classes are provided for a better understanding of how they behave.
The complete XML rule schema is located here: https://github.com/windup/windup/blob/master/config-xml/rule-schema.xsd.
The following sections describe the more common XML when rule conditions.
5.2.1. javaclass Syntax
Summary
Use the javaclass element to find imports, methods, variable declarations, annotations, class implementations, and other items related to Java classes. For a better understanding of the javaclass condition, see the JavaDoc for the JavaClass class.
The following is an example of a rule that tests for a javaclass.
<rule>
    <when>
        <javaclass references="org.jboss.ws.api.annotation.WebContext" in="org/jboss/{*}" as="webcontextclasses">
            <location>IMPORT</location>
            <location>TYPE</location>
        </javaclass>
    </when>
    <perform>
        <hint message="WebContext is deprecated." effort="0"/>
    </perform>
</rule>
Construct a javaclass Element
javaclass Element Attributes
- references="CLASS_NAME"
-
The package or class name to match on. Wildcard characters can be used.
Example: references="org.apache.commons.{*}" - as="VARIABLE_NAME"
-
A variable name assigned to the rule so that it can be used as a reference in later processing. See the
fromattribute below.Example: as="MyEjbRule"
- in="PATH_FILTER"
-
Used to filter input files matching this regex (regular expression) naming pattern. Wildcard characters can be used.
Example: in="{*}File1" - from="VARIABLE_NAME"
-
Begin the search query with the filtered result from a previous search identified by its
asVARIABLE_NAME.Example: from="MyEjbRule"
JavaClass Element Child Elements
- location
-
The location where the reference was found in a Java class. Location can refer to annotations, field and variable declarations, imports, and methods. For the complete list of valid values, see the JavaDoc for TypeReferenceLocation.
Example: <location>IMPORT</location>
5.2.2. xmlfile Syntax
Summary
Use the xmlfile element to find information in XML files. For a better understanding of the xmlfile condition, see the XmlFile JavaDoc.
The following is an example of a rule that tests for an xmlfile.
<rule>
    <when>
        <xmlfile matches="/w:web-app/w:resource-ref/w:res-auth[text() = 'Container']">
            <namespace prefix="w" uri="http://java.sun.com/xml/ns/javaee"/>
        </xmlfile>
    </when>
    <perform>
        <hint title="Title for Hint from XML">
            <message>Container Auth</message>
        </hint>
        <xslt description="Example XSLT Conversion" extension="-converted-example.xml"
              template="/exampleconversion.xsl"/>
    </perform>
</rule>
Construct an xmlfile Element
xmlfile Element: Attributes
- matches="XPATH"
-
Match on an XML file condition.
Example: matches="/w:web-app/w:resource-ref/w:res-auth[text() = 'Container']"
- xpathResultMatch="XPATH_RESULT_STRING"
-
Return results that match the given regex.
Example: xpathResultMatch=""
- as="VARIABLE_NAME"
-
A variable name assigned to the rule so that it can be used as a reference in later processing. See the
fromattribute below.Example: as="MyEjbRule"
- in="PATH_FILTER"
-
Used to filter input files matching this regex (regular expression) naming pattern. Wildcard characters can be used.
Example: in="{*}File1" - from="VARIABLE_NAME"
-
Begin the search query with the filtered result from a previous search identified by its
asVARIABLE_NAME.Example: from="MyEjbRule"
- public-id="PUBLIC_ID"
-
The DTD public-id regex.
Example: public-id="public"
xmlfile Element: Child Elements
- namespace
-
The namespace to referenced in XML files. This element contains 2 attributes: The
prefixand theuri.Example: <namespace prefix="abc" uri="http://maven.apache.org/POM/4.0.0"/>
5.2.3. project Syntax
Summary
Use the project element to find information in project files. For a better understanding of the project condition, see the JavaDoc for the Project class.
The following is an example of a rule that tests for an xmlfile.
<rule>
    <when>
        <project>
            <artifact groupId="junit" artifactId="junit" from="MyEjbRule" to="???"/>
        </project>
    </when>
    <perform>
        <hint title="Title for Hint for Project">
            <message>Descriptive message</message>
        </hint>
    </perform>
</rule>
Construct a project Element
project Element Attributes
The project element does not have any attributes.
project Element Child Elements
- artifact
-
The namespace to referenced in XML files. This element contains the following attributes:
-
groupId="PROJECT_GROUP_ID"
Match on the project
<groupId> -
artifactId="PROJECT_ARTIFACT_ID" Match on the project
<artifactId> -
from="VARIABLE_NAME"
Begin the search query with the filtered result from a previous search identified by its
asVARIABLE_NAME. ??? -
to = "???"
-
5.2.4. filecontent Syntax
Use the filecontent element to find information in file content.For a better understanding of the filecontent condition, see the JavaDoc for the FileContent class.
TBD : .Draft
Use the filecontent element to test for content within files. The following is an example of a rule that tests for filecontent.
5.3. XML Rule - Perform Action Syntax
Operations allowed in the perform section of the rule include the classification of application resources, in-line hints for migration steps, links to migration information, and project lineitem reporting. Because XML rules are modeled after the Java-based rule addons, links to JavaDocs for the related Java classes are provided for a better understanding of how they behave.
The complete XML rule schema is located here: https://github.com/windup/windup/blob/master/config-xml/rule-schema.xsd.
The following sections describe the more common XML rule perform actions.
5.3.1. classification Syntax
Summary
The classification element is used to identify or classify application resources. It provides a level of effort and can also provide links to additional information about how to migrate this resource classification. For a better understanding of the classification action, see the JavaDoc for the Classification class.
The following is an example of a rule that classifies a resource as a WebLogic EAR application deployment descriptor file.
Example:
<rule id="XmlWebLogicRules_10vvyf">
    <when>
        <xmlfile as="default" matches="/*[local-name()='weblogic-application']">
        </xmlfile>
    </when>
    <perform>
        <iteration>
            <classification classification="Weblogic EAR Application Descriptor" effort="3"/>
        </iteration>
    </perform>
</rule>
Construct a classification Element
classification Element Attributes
- classification="STRING"
-
Classify the resource as the specified string.
Example:
classification="JBoss Seam Components"
- effort="NUMBER"
-
The level of effort assigned to this resource.
Example:
effort="2"
classification Element Child Elements
- xref
-
Provides a link URI and text description for additional information.
Example:
<classification classification="Websphere Startup Service" effort="4">
    <link href="http://docs.oracle.com/javaee/6/api/javax/ejb/Singleton.html" description="EJB3.1 Singleton Bean"/>
    <link href="http://docs.oracle.com/javaee/6/api/javax/ejb/Startup.html" description="EJB3.1 Startup Bean"/>
 </classification>
5.3.2. link Syntax
Summary
The link element is used in classifications or hints to identify or classify links to informational content. For a better understanding of the link action, see the JavaDoc for the Link class.
The following is an example of a rule that creates links to additional information.
Example:
<rule id="SeamToCDIRules_2fmb">
    <when>
        <javaclass references="org.jboss.seam.{*}" as="default"/>
    </when>
    <perform>
        <iteration>
            <classification classification="SEAM Component" effort="1">
                <link href="http://www.seamframework.org/Seam3/Seam2ToSeam3MigrationNotes" description="Seam 2 to Seam 3 Migration Notes"/>
                <link href="http://docs.jboss.org/weld/reference/latest/en-US/html/example.html" description="JSF Web Application Example"/>
                <link href="http://docs.jboss.org/weld/reference/latest/en-US/html/contexts.html" description="JBoss Context Documentation"/>
                <link href="http://www.andygibson.net/blog/tutorial/cdi-conversations-part-2/" description="CDI Conversations Blog Post"/>
            </classification>
        </iteration>
    </perform>
</rule>
Construct a link Element
link Element: Attributes
- href="URI"
-
The URI for the referenced link/.
Example:
href="https://access.redhat.com/articles/1249423"
- description="URI_DESCRIPTION"
-
A description for the link.
Example:
description="Migrate WebLogic Proprietary Servlet Annotations"
5.3.3. hint Syntax
Summary
The hint element is used to provide a hint or inline information about how to migrate a section of code. For a better understanding of the hint action, see the JavaDoc for the Hint class.
The following is an example of a rule that creates a hint.
Example:
<rule id="WebLogicWebServiceRules_8jyqn">
    <when>
        <javaclass references="weblogic.wsee.connection.transport.http.HttpTransportInfo.setUsername({*})" as="default">
            <location>METHOD</location>
        </javaclass>
    </when>
    <perform>
        <iteration>
            <hint message="Replace proprietary web-service authentication with JAX-WS standards." effort="0">
                <link href="http://java-x.blogspot.com/2009/03/invoking-web-services-through-proxy.html" description="JAX-WS Proxy Password Example"/>
            </hint>
        </iteration>
    </perform>
</rule>
Construct a hint Element
hint Element: Attributes
- message="MESSAGE"
-
A message describing the migration hint
Example:
message=""
- effort="NUMBER"
-
The level of effort assigned to this resource.
Example:
effort="2"
hint Element: Child Elements
- xref
-
Identify or classify links to informational content. See the section on link Syntax for details.
Example:
link href="http://java-x.blogspot.com/2009/03/invoking-web-services-through-proxy.html" description="JAX-WS Proxy Password Example"/>
5.3.4. xslt Syntax
Summary
The xslt element specifies how to transform an XML file. For a better understanding of the xslt action, see the JavaDoc for the XSLTTransformation class.
The following is an example of rule that defines an XSLT action.
Example:
<rule id="XmlWebLogicRules_6bcvk">
    <when>
        <xmlfile as="default" matches="/weblogic-ejb-jar"/>
    </when>
    <perform>
        <iteration>
            <classification classification="Weblogic EJB XML" effort="3"/>
            <xslt description="JBoss EJB Descriptor (Windup-Generated)" template="transformations/xslt/weblogic-ejb-to-jboss.xsl" extension="-jboss.xml"/>
        </iteration>
    </perform>
</rule>
Construct an xslt Element
xslt Element: Attributes
- of="STRING"
-
Create a new transformation for the given reference.
Example:
of="testVariable_instance"
- description="String"
-
Sets the description of this XSLTTransformation.
Example:
description="XSLT Transformed Output"
- extension="String"
-
Sets the extension for this XSLTTransformation.
Example:
extension="-result.html"
- template=String
-
Sets the XSL template.
Example:
template="simpleXSLT.xsl"
xslt Element: Child Elements
- xslt-parameter=Map<String,String>
-
Specify XSLTTransformation parameters as property value pairs
Example:
<xslt-parameter property="title" value="EJB Transformation"/>
5.3.5. lineitem Syntax
Summary
The lineitem element is used to provide line item information about a hint on the project or application overview page. For a better understanding of the lineitem action, see the JavaDoc for the Lineitem class.
The following is an example of a rule that creates a lineitem message.
Example:
<rule>
    <when>
        <javaclass references="weblogic.servlet.annotation.WLServlet" as="default">
            <location>ANNOTATION</location>
        </javaclass>
    </when>
    <perform>
        <hint message="Replace the proprietary WebLogic @WLServlet annotation with the Java EE 6 standard @WebServlet annotation." effort="1">
            <link href="https://access.redhat.com/articles/1249423" description="Migrate WebLogic Proprietary Servlet Annotations" />
            <lineitem message="Proprietary WebLogic @WLServlet annotation found in file."/>
        </hint>
    </perform>
</rule>
Construct a lineitem Element
lineitem Element: Attributes
- message="MESSAGE"
-
A lineitem message
Example:
message="Proprietary code found."
5.3.6. iteration Syntax
Summary
The iteration element specifies to iterate over an implicit or explicit variable defined within the rule. For a better understanding of the iteration action, see the JavaDoc for the Iteration class.
The following is an example of a rule that preforms an iteration.
Example:
<rule id="XmlWebLogicRules_14wscy">
     <when>
         <xmlfile as="1" matches="/wl:weblogic-webservices | /wl9:weblogic-webservices">
             <namespace prefix="wl9" uri="http://www.bea.com/ns/weblogic/90"/>
             <namespace prefix="wl" uri="http://www.bea.com/ns/weblogic/weblogic-webservices"/>
         </xmlfile>
         <xmlfile as="2" matches="//wl:webservice-type | //wl9:webservice-type" from="1">
             <namespace prefix="wl9" uri="http://www.bea.com/ns/weblogic/90"/>
             <namespace prefix="wl" uri="http://www.bea.com/ns/weblogic/weblogic-webservices"/>
         </xmlfile>
     </when>
     <perform>
         <iteration over="1">
             <classification classification="Weblogic Webservice Descriptor" effort="0"/>
         </iteration>
         <iteration over="2">
             <hint message="Webservice Type" effort="0"/>
         </iteration>
     </perform>
 </rule>
Construct an iteration Element
iteration Element: Attributes
- over="NUMBER"
-
??
Example:
over="2"
iteration Element: Child Elements
iteration child elements include a when condition, along with the actions iteration, classification, hint, xslt, lineitem, and otherwise.
5.4. Test an XML Rule in Windup
5.4.1. Add the Rule to Windup
A Windup rule is installed simply by copying the rule to the appropriate Windup folder. Windup scans for rules in the following locations:
-
The
WINDUP_HOME/rules/folder.This is the folder where you run the Windup executable. See About the WINDUP_HOME Variable for details.
-
The
${user.home}/.windup/rules/folder.This folder is created by Windup the first time you execute Windup. It used to track rules and addons and to contains the Windup log.
For Linux or Mac:   ~/.windup/rules/
For Windows: "\Documents and Settings\USER_NAME\.windup\rules\"  -or-  "\Users\USER_NAME\.windup\rules\"
5.4.2. Test the XML Rule
-
If you have not started Windup, follow the instructions to Execute Windup.
-
Test the XML rule against your application file by running the
windup-migrate-appcommand in the Windup console prompt.The command uses this syntax:
windup-migrate-app [--sourceMode true] --input INPUT_ARCHIVE_OR_FOLDER --output OUTPUT_REPORT_DIRECTORY --packages PACKAGE_1 PACKAGE_2 PACKAGE_N
You should see the following result:
***SUCCESS*** Windup report created: OUTPUT_REPORT_DIRECTORY/index.html
5.4.3. Additional Resources
-
For more information and examples of how to run Windup, see: Execute Windup
-
Working examples of XML-based rules can be found on GitHub in the Windup source code GitHub repository and the Windup quickstarts GitHub repository or latest release ZIP download.
6. Review the Report
6.1. Review the Report
6.1.1. About the Report
When you execute Windup, the report is generated in the OUTPUT_REPORT_DIRECTORY you specify for the --output argument in the command line. This output directory contains the following files and subdirectories:
-
index.html: This is the landing page for the report. -
archives/: Contains the archives extracted from the application -
graph/: Contains binary graph database files -
reports/: This directory contains the generated HTML report files -
stats/: Contains Windup performance statistics
The examples below use the test-files/jee-example-app-1.0.0.ear located in the Windup GitHub source repository for input and specify the com.acme and org.apache package name prefixes to scan. For example:
windup-migrate-app --input /home/username/windup-source/test-files/jee-example-app-1.0.0.ear/ --output /home/username/windup-reports/jee-example-app-1.0.0.ear-report --packages com.acme org.apache
6.1.2. Open the Report
Use your favorite browser to open the index.html file located in the output report directory. You should see something like the following:
Click on the link under the Name column to view the Windup application report page.
6.1.3. Report Sections
Application Report Page
The first section of the application report page summarizes the migration effort. It provides the total Story Points and a graphically displays the effort by technology. A Story Point is a term commonly used in Scrum Agile software development methodology to estimate the level of effort needed to implement a feature or change. It does not necessarily translate to man-hours, but the value should be consistent across tasks.
-
The migration of the JEE Example App EAR is assigned a total of 42 story points. A pie chart shows the breakdown of story points by package.
-
This is followed by a section for each of the archives contained in the EAR. It provides the total of the story points assigned to the archive and lists the files contained in archive along with the warnings and story point assigned to each file.
The following is an example of a Windup Application Report.
Archive Analysis Sections
Each archive summary begins with a total of the story points assigned to its migration, followed by a table detailing the changes required for each file in the archive. The report contains the following columns.
- Name
-
The name of the file being analyzed
- Technology
-
The type of file being analyzed. For example:
-
Java Source
-
Decompiled Java File
-
Manifest
-
Properties
-
EJB XML
-
Spring XML
-
Web XML
-
Hibernate Cfg
-
Hibernate Mapping
-
- Issues
-
Warnings about areas of code that need review or changes.
- Estimated Story Points
-
Level of effort required for migrating the file.
The following is an example of the archive analysis summary section of a Windup Report. In this example, it’s the analysis of the WINDUP_SOURCE/test-files/jee-example-app-1.0.0.ear/jee-example-services.jar.
File Analysis Pages
The analysis of the jee-example-services.jar lists the files in the JAR and the warnings and story points assigned to each one. Notice the com.acme.anvil.listener.AnvilWebLifecycleListener file has 5 warnings and is assigned 7 story points. Click on the file to see the detail.
-
The Information section provides a summary of the story points and notes that the file was decompiled by Windup.
-
This is followed by the file source code listing. Warnings appear in the file at the point where migration is required.
In this example, warnings appear at the import of weblogic.application.ApplicationLifecycleEvent and report that the class is proprietary to WebLogic and must be removed.
Later in the code, warnings appear for the creation of the InitialContext and for the object name when registering and unregistering an MBeans
6.1.4. Additional Reports
Explore the Windup OUTPUT_REPORT_DIRECTORY/reports folder to find additional reporting information.
Rule Provider Execution Report
The OUTPUT_REPORT_DIRECTORY/reports/windup_ruleproviders.html page provides the list of rule providers that executed when running the Windup migration command against the application.
Rule Provider Execution Report
The OUTPUT_REPORT_DIRECTORY/reports/windup_ruleproviders.html page provides the list of rule providers that executed when running the Windup migration command against the application.
Individual File Analysis Reports
You can directly access the the file analysis report pages described above by browsing for them by name in the OUTPUT_REPORT_DIRECTORY/reports/ directory. Because the same common file names can exist in multiple archives, for example "manifest.mf" or "web.xml", Windup adds a unique numeric suffix to each report file name.
7. External Rule Examples
7.1. Review the Windup Quickstarts
The Windup quickstarts provide working examples of how to create custom Java-based rule addons and XML rules. You can use them as a starting point for creating your own custom rules. The quickstarts are available on GitHub here: https://github.com/windup/windup-quickstarts
You can fork and clone the project to have access to regular updates or you can download a ZIP file of the latest version.
7.1.1. Download the Latest ZIP
To download the latest quickstart ZIP file, browse to: https://github.com/windup/windup-quickstarts/releases
Click on the most recent release to download the ZIP to your local file system.
7.1.2. Fork and Clone the GitHub Project
If you don’t have the GitHub client (git), download it from: http://git-scm.com/
-
Click the
Forklink on the Windup quickstart GitHub page to create the project in your own Git. The forked GitHub repository URL created by the fork should look like this: https://github.com/YOUR_USER_NAME/windup-quickstarts.git -
Clone your Windup quickstart repository to your local file system:
git clone https://github.com/YOUR_USER_NAME/windup-quickstarts.git
-
This creates and populates a
windup-quickstartsdirectory on your local file system. Navigate to the newly created directory, for examplecd windup-quickstarts/
-
If you want to be able to retrieve the lates code updates, add the remote
upstreamrepository so you can fetch any changes to the original forked repository.git remote add upstream https://github.com/windup/windup-quickstarts.git
-
To get the latest files from the
upstreamrepository.git reset --hard upstream/master
8. Debugging and Troubleshooting
8.1. Debugging and Profiling
8.1.1. Debug the Windup Distribution Runtime
You can debug the Windup distribution using one of the following approaches.
-
Pass the
--debugargument on the command line when you execute Windup.For Linux: WINDUP_HOME/bin $ ./windup --debug For Windows: C:\WINDUP_HOME\bin> windup --debug
-
Configure the
FORGE_OPTSfor debugging.export FORGE_OPTS="-Xdebug -Xnoagent -Djava.compiler=NONE -Xrunjdwp:transport=dt_socket,server=y,suspend=y,address=8000"
8.1.2. Debug a Test Using NetBeans
Click the Debug Test File button, or choose Menu → Debug → Debug Test File.
8.1.3. Profile a Test Using NetBeans
-
Profiling requires a lot of memory, so be sure to increase the NetBeans memory settings.
-
Open the
NETBEANS_HOME/etc/netbeans.conffile -
Find the line with
netbeans_default_options= -
Add the following option
-J-Xmx5200m -J-XX:MaxPermSize=1024m
-
Restart NetBeans.
-
-
Click
Menu > Profile > Profile Test File. -
In the resulting dialog, enter the following.
exec.args=-Djboss.modules.system.pkgs=org.netbeans
8.1.4. Profile Forge Runtime Using YourKit
-
Download and unzip YourKit. Be sure to get the trial license.
-
Configure the
FORGE_OPTSfor Yourkit:export YOURKIT_HOME=/home/ondra/sw/prog/YourKit-b14092 export FORGE_OPTS="-Djboss.modules.system.pkgs=com.yourkit -agentpath:$YOURKIT_HOME/bin/linux-x86-64/libyjpagent.so=sampling,onexit=snapshot,delay=0"
-
Run
forge. For details, see Profiling Forge, but skip the first 2 points that direct you to copy the YourKit module and JAR into the Forge installation. Forge 2 already contains the YourKit module and JAR>. -
Run
windup-analyze-app.forge -e windup-migrate-app
8.2. Troubleshoot Windup Issues
8.2.1. Logging
Logging is currently broken and will not be fixed any time soon.
See Known Issues and WINDUP-73 for the current status.
8.2.2. Debugging Exceptions
Exceptions in Surefire reports are broken due to the way Forge wraps
exceptions and the way Surefire handles them. You need to
debug or rewrap exceptions using TestUtil.rewrap(ex).
See Known Issues and WINDUP-197 for the current status..
8.2.3. Classloading Problems
Configuring dependencies in a Forge-based project can be a little tricky. See Dependencies for some hints.
Caused by: java.lang.IllegalArgumentException: Type value for model 'org.jboss.windup.rules.files.model.FileReferenceModel' is already registered with model org.jboss.windup.rules.files.model.FileReferenceModel
This means that the model class is loaded twice. I.e. the module containing it is loaded twice. Or, in tests, you may be (accidentally) adding the class to the deployment. This may especially happen after Maven coordinates of some module are changed.
9. Additional Resources
9.1. Available Rule Utilities
9.1.1. Programmatically Access the Graph
Note: Needs update. This is out of date!
(Lower Level API, to cover cases not provided by high level API)
This topic describes how to to programmatically access or update graph data when you create a Java-based rule addon.
Query the graph
There are several ways - including Query API, Gremlin support, or GraphService methods.
Query the Graph Within the .when() method
Building a rule contains the method when(), which is used to create a condition. Vertices that fulfill the condition, are passed to the perform() method.
For the queries in the when() method, class Query is used. There are several methods which you can use to specify the condition. For example: * find() specifies the Model type of the vertex * as() method specifies the name of the final list, that is passed to the perform() method * from(String name) starts the query not on the all vertices, but only on the vertices already stored in the the given name (used to begin query on the result of the other one) * withProperty() specify the property value of the given vertex
The following are examples of simple queries.
Return a list of archives
Query.find(ArchiveModel.class)Query.find(ApplicationReportModel.class).as(VAR_APPLICATION_REPORTS)Iteration
ConfigurationBuilder.begin().addRule()
    .when(
        GraphSearchConditionBuilderGremlin.create("javaFiles", new ArrayList())
        .V().framedType( JavaFileModel.class ).has("analyze")
    )
    .perform(
        // For all java files...
        Iteration.over("javaFiles").var("javaFile").perform(
Nested Iteration
code,java
// For all java files...
Iteration.over("javaFiles").var("javaFile").perform(
    // A nested rule.
    RuleSubset.evaluate(
        ConfigurationBuilder.begin().addRule()
        .when(...)
        .perform(
            Iteration.over("regexes").var(RegexModel.class, "regex").perform(
                new AbstractIterationOperator<RegexModel>( RegexModel.class, "regex" ) {
                    public void perform( GraphRewrite event, EvaluationContext context, RegexModel regex ) {
                        //...
                    }
                }
            )
            .endIteration()
        )// perform()
    )
)
9.1.2. Modify Graph Data
For more custom operations dealing with Graph data that are not covered by the Query mechanism, use the GraphService.
GraphService<FooModel> fooService = new GraphService<FooModel>(graph,FooModel.class);

List<FooModel> = fooService.findAll();
FooModel = fooService.create();

// etc ...
GraphService<> can also be used to query the graph for models of the specified type:
FooModel foo = new GraphService<>(graphContext, FooModel.class).getUnique();FooModel foo = new GraphService<>(graphContext, FooModel.class).getUniqueByProperty("size", 1);9.2. Review the Windup Quickstarts
The Windup quickstarts provide working examples of how to create custom Java-based rule addons and XML rules. You can use them as a starting point for creating your own custom rules. The quickstarts are available on GitHub here: https://github.com/windup/windup-quickstarts
You can fork and clone the project to have access to regular updates or you can download a ZIP file of the latest version.
9.2.1. Download the Latest ZIP
To download the latest quickstart ZIP file, browse to: https://github.com/windup/windup-quickstarts/releases
Click on the most recent release to download the ZIP to your local file system.
9.2.2. Fork and Clone the GitHub Project
If you don’t have the GitHub client (git), download it from: http://git-scm.com/
-
Click the
Forklink on the Windup quickstart GitHub page to create the project in your own Git. The forked GitHub repository URL created by the fork should look like this: https://github.com/YOUR_USER_NAME/windup-quickstarts.git -
Clone your Windup quickstart repository to your local file system:
git clone https://github.com/YOUR_USER_NAME/windup-quickstarts.git
-
This creates and populates a
windup-quickstartsdirectory on your local file system. Navigate to the newly created directory, for examplecd windup-quickstarts/
-
If you want to be able to retrieve the lates code updates, add the remote
upstreamrepository so you can fetch any changes to the original forked repository.git remote add upstream https://github.com/windup/windup-quickstarts.git
-
To get the latest files from the
upstreamrepository.git reset --hard upstream/master
9.3. Known Windup Issues
Windup known issues are tracked here: Open Windup issues
9.4. Glossary of Terms Used in Windup
9.4.1. Rules Terms
- Rule
-
A piece of code that performs a single unit of work during the migration process. Depending on the complexity of the rule, it may or may not include configuration data. Extensive configuration information may be externalized into external configuration, for example, a custom XML file. The following is an example of a Java-based rule added to the
JDKConfigRuleProvider class.
.addRule()
    .when(JavaClass.references("java.lang.ClassLoader$").at(TypeReferenceLocation.TYPE))
    .perform(Classification.as("Java Classloader, must be migrated.")
    .with(Link.to("Red Hat Customer Portal: How to get resources via the ClassLoader in a JavaEE application in JBoss EAP",  "https://access.redhat.com/knowledge/solutions/239033"))
.withEffort(1))- RuleProvider
-
A class that implements one or more rules using the
.addRule()method. The following are examples of legacy Java RulesProviders that are defined inrules-java-eeruleset.-
EjbConfig
-
JDKConfig
-
SeamToCDI
-
- Ruleset
-
A ruleset is a group of one or more RuleProviders that targets a specific area of migration, for example,
Spring → Java EE 6orWebLogic → JBoss EAP. A ruleset is packaged as a JAR and contains additional information needed for the migration, such as operations, conditions, report templates, static files, metadata, and relationships to other rulesets. The following Windup projects are rulesets.-
rules-java-ee
-
rules-xml
-
- Rules Metadata
-
Information about whether a particular ruleset applies to a given situation. The metadata can include the source and target platform and frameworks.
- Rules Pipeline
-
A collection of rules that feed information into the knowledge graph.
9.4.2. Reporting Terms
- Lift and Shift (Level of effort)
-
The code or file is standards-based and can be ported to the new environment with no changes.
- Mapped (Level of effort)
-
There is a standard mapping algorithm to port the code or file to the new environment.
- Custom (Level of effort)
-
The code or file must be rewritten or modified to work in the new environment.
- Story Point
-
A term commonly used in Scrum Agile software development methodology to estimate the level of effort needed to implement a feature or change. It does not necessarily translate to man-hours, but the value should be consistent across tasks.
10. Appendix
10.1. Windup Architectural Components
The following open source software, tools, and APIs are used within Windup to analyze and provide migration information. If you plan to contribute source code to the core Windup 2.0 project, you should be familiar with them.
10.1.1. Forge
Forge is an open source, extendable, rapid application development tool for creating Java EE applications using Maven. For more information about Forge 2, see: JBoss Forge.
10.1.2. Forge Furnace
Forge Furnace is a modular runtime container behind Forge that provides the ability to run Forge addons in an embedded application. For more information about Forge Furnace, see: Run Forge Embedded.
10.1.3. TinkerPop
TinkerPop is an open source graph computing framework. For more information, see: TinkerPop.
10.1.4. Titan
Titan is a scalable graph database optimized for storing and querying graphs. For more information, see: Titan Distributed Graph Database and Titan Beginner’s Guide.
10.1.5. Frames
Frames represents graph data in the form of interrelated Java Objects or a collection of annotated Java Interfaces. For more information, see: TinkerPop Frames.
Windup includes several Frames extensions, which are documented here: Frames Extensions.
10.1.6. Gremlin
Gremlin is a graph traversal language that allows you to query, analyze, and manipulate property graphs that implement the Blueprints property graph data model. For more information, see: TinkerPop Gremlin Wiki.
10.1.7. Blueprints
Blueprints is an industry standard API used to access graph databases. For more information about Blueprints, see: TinkerPop Blueprints Wiki.
10.1.8. Pipes
Pipes is a dataflow framework used to process graph data. It for the transformation of data from input to output. For more information, see: Tinkerpop Pipes Wiki.
10.1.9. Rexster
Rexster is a graph server that exposes any Blueprints graph through HTTP/REST and a binary protocol called RexPro. Rexster makes extensive use of Blueprints, Pipes, and Gremlin. For more information, see: TinkerPop Rexster Wiki.
10.1.10. OCPsoft Rewrite
OCPsoft Rewrite is an open source routing and URL rewriting solution for Servlets, Java Web Frameworks, and Java EE. For more information about Ocpsoft Rewrite, see: OCPsoft Rewrite.
10.2. Dependencies (Forge add-ons)
Based on this discussion.
10.2.1. Maven Add-on Structure
The following is the typical structure of Maven add-on modules.
myaddon-parent
+--- myaddon - jar, classifier: forge-addon
+--- myaddon-api - jar
+--- myaddon-impl - jar
+--- myaddon-tests - jar
The add-on POM file can declare dependencies on other forge-addons.
To prevent exporting the add-on to dependent modules, use <optional>true</optional>.
<dependency>
    <groupId>org.jboss.forge.furnace.container</groupId>
    <artifactId>cdi</artifactId>
    <classifier>forge-addon</classifier>
    <optional>true</optional>
</dependency>
The add-on POM files may also declare a dependency on typical Maven artifacts.
To prevent exporting the add-on to dependent modules, use <optional>true</optional>.
<dependency>
    <groupId>com.thinkaurelius.titan</groupId>
    <artifactId>titan-lucene</artifactId>
    <version>${version.titangraph.lucene}</version>
</dependency>
One more question regarding dependencies. Is it advisable to depend on the`forge-addon` artifact from add-on’s subparts?
Add-ons should reference the <classifier>forge-addon</classifier>
artifact from other add-ons.
10.2.2. Add-on sub-parts
Add-on sub-parts declare dependency preferably on forge add-on APIs, not
on the add-ons themselves, wherever possible (wherever an add-on has an
explicit API). These dependencies must be marked as provided scope.
<dependency>
    <groupId>org.jboss.forge.furnace.container</groupId>
    <artifactId>cdi-api</artifactId>
    <classifier>forge-addon</classifier>
    <scope>provided</scope>
</dependency>
They may instead depend on the primary add-on dependency, e.g.
forge-addon. The latter makes the POM files simpler, but can be confusing,
because the add-on dependency still needs to be declared in the depending
add-on’s POM.
<dependency>
    <groupId>org.jboss.forge.furnace.container</groupId>
    <artifactId>cdi-api</artifactId>
</dependency>
Declaring a forge-addon depencendy anywhere else than the
forge-addon pom doesn’t actually cause Furnace to establish an add-on
dependency. I.e. classes from the dep won’t be available unless you
declare it in the `forge-addon’s pom.
Add-on’s sub-parts may also declare dependencies on other normal maven dependencies, and these are treated as normal.
|
Note
|
Add-on depends on API , scope |
10.2.3. Test dependencies
For test dependencies on add-ons: Any addon/sub-part requiring an addon
for testing purposes should use <scope>test</scope>.
<dependency>
    <groupId>org.jboss.windup.graph</groupId>
    <artifactId>windup-graph</artifactId>
    <version>${project.version}</version>
    <classifier>forge-addon</classifier>
    <scope>test</scope>
</dependency>
10.2.4. Dependencies between sub-parts within the same add-on
Subpart may declare dependency on other subpart. E.g. impl typically
depends on api. In that case, the scope should be set appropriately
for the given situation - typically provided or compile scope.
<dependency>
    <groupId>org.jboss.windup.graph</groupId>
    <artifactId>windup-graph-api</artifactId>
    <scope>compile</scope>
</dependency>
10.3. Windup Models
Windup models are the classes extending WindupVertexFrame. They are used to model the data in the graph database to Java objects.
This is an overview of the most important models. The complete and up-to-date list of models is in Javadoc.
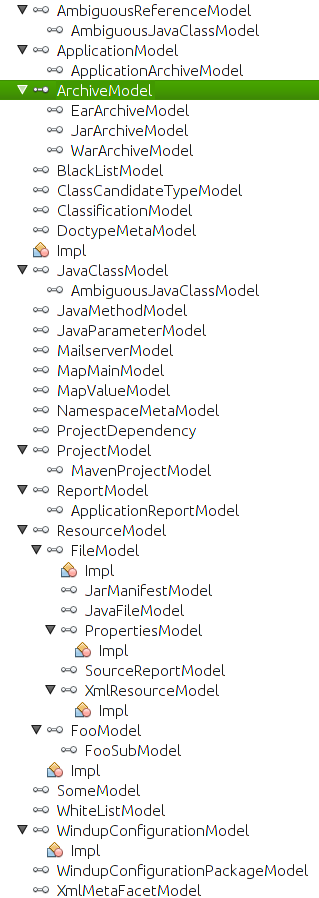
10.3.1. Meta Models
-
User input
-
Rules and Rule Providers metadata
10.3.2. Core Models
FileModel ArchiveModel
10.3.3. Reporting Models
10.3.4. Custom Models (coming from Addons)
See respective ruleset’s documentation.